🔥 Act Now! FREE $425 Transformer & Photocell with 10+ Fixture Lighting System!


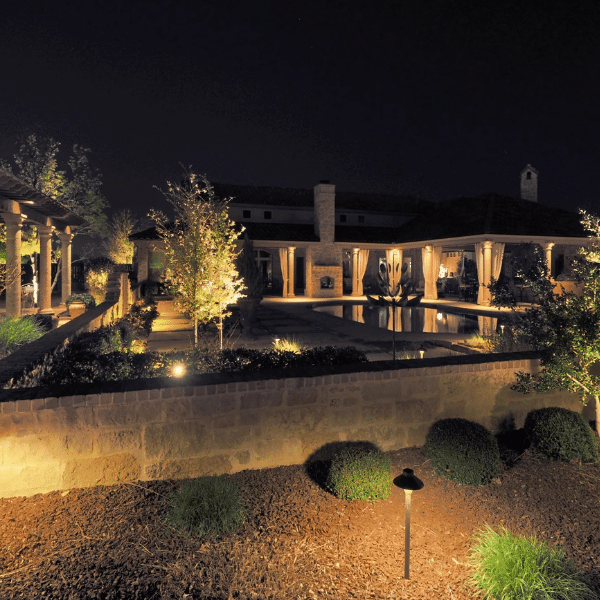
it before. A home that glows at night in all the right ways. Pathways are softly lit. Trees highlighted. The front entry is warm and welcoming.
Then you try your own low-voltage landscape lighting DIY project, only to end up with uneven, dim, or cluttered wiring.
Here’s the thing. Installing outdoor low-voltage lights is not complicated, but it does require a clear plan. If you are in the Minneapolis metro area and thinking about upgrading your yard lighting, you are not alone. Many homeowners want better curb appeal and safer walkways without hiring a full crew.
This guide will walk you step by step through installing outdoor low-voltage lights correctly, including transformer setup and low-voltage wiring, so you can do it like a pro.
What We’ll Cover:
- How low-voltage landscape lighting works
- Planning your layout the right way
- How to install outdoor low-voltage lights step by step
- Low-voltage lighting transformer installation explained
- Low-voltage wiring for outdoor lighting is done safely
- Common mistakes to avoid
- When DIY makes sense and when it does not
How Low-Voltage Landscape Lighting Actually Works

Let’s start with the basics.
Low-voltage landscape lighting typically runs on 12 volts. Your home power supply is 120 volts. That is where the transformer comes in. It reduces standard household voltage down to a safe level for outdoor lighting.
A simple system includes:
- A transformer
- Low-voltage wiring
- Light fixtures
- Connectors
- A timer or smart control
When installed correctly, these systems are safe, energy efficient, and long-lasting. Most use LED bulbs, which consume far less power than older halogen styles and last significantly longer. If you are looking to save money with energy-efficient outdoor lighting, LED is the clear choice.
What this really means is you can run multiple fixtures across your yard without driving up your electric bill.
Step 1: Plan Your Outdoor Lighting Layout Like a Designer
Before you dig anything, plan.
Most low-voltage landscape lighting DIY mistakes happen because homeowners skip this step. They buy a kit, install lights randomly, and hope for the best.
Start with three goals:
- Safety
- Beauty
- Function
Walk your property at night with a flashlight. Notice dark spots. Look at trees, architectural features, and pathways.
Here is a simple layout approach:
Path Lighting
- Space fixtures 6 to 8 feet apart
- Stagger them instead of placing them directly across from each other
- Aim for a soft glow, not runway brightness
Uplighting
- Place fixtures 6 to 12 inches from tree trunks
- Angle lights to highlight texture and structure
- Avoid shining directly into windows
Accent Lighting
- Highlight stone walls, columns, or water features
- Keep light subtle and controlled

Sketch your layout. Mark where the transformer will sit. This should be close to a GFCI outdoor outlet and ideally hidden behind landscaping.
Good planning saves time, money, and frustration.
Step 2: How to Install Outdoor Low-Voltage Lights
Now, let’s break down how to install outdoor low-voltage lights in a simple, clear way.
1. Mount the Transformer
Choose a location near an outdoor outlet. Mount the transformer at least 12 inches above the ground. Keep it protected from heavy rain and snow buildup.
Do not plug it in yet.
2. Lay Out the Fixtures
Place each light where you planned it. Do not bury anything yet. Just position them on top of the soil to confirm spacing and angles.
3. Run the Low Voltage Wiring
Use direct burial rated low-voltage cable. Common sizes are 12 gauge or 14 gauge, depending on load and distance.
Run the main cable from the transformer to the first fixture. Continue along the path to each additional fixture.
Avoid sharp bends. Leave some slack at each light.
4. Connect the Fixtures
Most DIY kits use clamp-style connectors that pierce the insulation.
Make sure:
- Connections are tight
- Copper is making full contact
- Wires are not exposed
Loose connections are the number one cause of lighting failure.
5. Test the System
Now plug in the transformer. Turn the system on and check each fixture.
Adjust angles. Confirm brightness. Look at it from the street and from inside your home.
6. Bury the Wiring
Once everything works properly, bury the cable 4 to 6 inches deep. In landscaped beds, you can tuck wiring under mulch.
Keep wiring neat and organized.
Low Voltage Lighting Transformer Installation Done Right
The transformer is the heart of your system. If it is undersized or poorly installed, your lights will flicker or dim.
Here is what you need to know.

Choose the Right Size
Add up the total wattage of all fixtures.
Example:
- 10 LED fixtures at 5 watts each
- Total load: 50 watts
Add a 20-30% buffer.
So in this case, you would want at least a 75-watt transformer.
This prevents overload and extends lifespan.
Multi Tap Transformers
For longer runs, voltage drop becomes a problem. Lights farther from the transformer may appear dim.
Multi-tap transformers allow you to select higher output settings, such as 13 or 14 volts, to compensate for distance.
If your yard is large, this is worth considering.
Timer and Smart Controls
Most transformers include:
- Mechanical timers
- Photocells
- Smart app controls
Set your system to turn on at dusk and off at a set time. This saves energy and removes the hassle of manual operation.
Low Voltage Wiring for Outdoor Lighting Without Headaches
Low-voltage wiring for outdoor lighting is simple in theory, but easy to mess up.
Here are the essentials.
Use the Right Gauge
- 14 gauge for shorter runs and lower wattage
- 12 gauge for longer distances or heavier loads
Undersized wire leads to a voltage drop. That means dim lights at the end of the line.
Wiring Methods
There are three common layouts:
- Straight line
- T method
- Hub method
The hub method often provides more balanced voltage because each fixture connects closer to a central point.
For larger or high-end systems, professionals often avoid long daisy chains.
Waterproof Connections Matter
Moisture causes corrosion. Corrosion causes failure.
Use gel-filled connectors or waterproof wire nuts. Avoid cheap plastic clip connectors if possible.
A little extra care here prevents future repairs.
Common DIY Mistakes That Ruin Outdoor Lighting Projects
Let’s talk about what goes wrong most often.
Overlighting
More is not better. Too many bright lights create glare and wash out your home.
Poor Fixture Placement
Lights placed too close to walkways cause harsh shadows.
Ignoring Voltage Drop
Long runs without proper wire sizing lead to uneven brightness.
Burying Before Testing
Always test the system fully before covering wires.
Skipping Design Planning
Lighting is part science, part art. Without intention, it looks random.
If you avoid these mistakes, your results will instantly improve.
When Low-Voltage Landscape Lighting DIY Makes Sense
DIY can be a great option if:
- Your yard is small
- You have basic electrical knowledge
- You enjoy hands-on projects
- Your layout is simple
But here is the honest truth.
As properties get larger, designs become more complex. Tree uplighting, layered lighting, and precise beam control require experience.
At Lit Outdoor Lighting Company, we often meet homeowners who tried DIY first. Sometimes it works out well. Sometimes they ask us to redesign and fix uneven layouts.
There is no shame in either path. It comes down to your time, budget, and expectations.
If you are weighing your options, you may also want to read about why professional outdoor lighting beats DIY and whether professional landscape lighting is worth it.
Why Professional Design Often Looks So Different
Lighting design is not just about installing fixtures. It is about balance.
At Lit Outdoor Lighting Company in Shorewood, MN, we have helped homeowners across the Minneapolis metro area create systems that look natural, not obvious.
We focus on:
- Proper beam spread
- Strategic shadow placement
- Layered lighting effects
- Long-term durability
One major difference is our demo installation process. Homeowners can see a preview of their lighting before committing. That removes guesswork and builds confidence.
Many national brands skip this step. We believe seeing your home illuminated first changes everything.
You can also explore our recent projects in our lighting gallery to see real examples.
Ready to Take the Next Step?
If you are excited to try your own low-voltage landscape lighting DIY project, use this guide as your roadmap.
If you would rather see what professional design looks like on your home before making a decision, we can help with that, too.
You can explore our outdoor lighting services or schedule a free consultation to talk through your goals. No pressure. Just clear guidance and honest answers.
Frequently Asked Questions About Installing Low-Voltage Landscape Lighting
Transform Your Yard With Confidence
Installing low-voltage landscape lighting as a pro starts with planning, proper transformer selection, and smart wiring decisions.
Do it carefully, and your yard becomes safer, more welcoming, and far more impressive after dark. Many homeowners also discover how outdoor lighting increases your home’s value once it is professionally designed and installed.
If you are in the Minneapolis metro area and want expert input, design support, or a full-service installation handled start to finish, Lit Outdoor Lighting Company is here to help.
Explore our landscape lighting services, learn more about our demo installation option, or schedule your free consultation today. Your home deserves to shine for the right reasons.

Providing premier outdoor lighting solutions & installation services We proudly serve the Twin Cities, MN and thew surrounding areas with innovative outdoor and holiday lighting solutions.
Latest posts by Lit Outdoor Lighting Company (see all)
- Expert Guide: Installing Low-Voltage Landscape Lighting Like a Pro - February 20, 2026
- Who Can Put Up My Outdoor Christmas Lights? - December 8, 2025
- Are Professional Christmas Lights Worth It? - December 8, 2025